Copyright © 1998 by Ian Currie
One of the problems with understanding glazes is that many teachers have been stressing for years how easy it is to make them - throw a few things together and presto! a wonderful new glaze. While this often happens, often it doesn't, and the "throw in" method teaches little about the principles, and how to adjust glazes to meet a specific purpose.
Some teachers do the opposite, stressing the importance of theoretical knowledge, teaching chemistry and Seger Formulae, and doing lots of calculations.
Without going to either of these extremes, without being either patronizing or overzealous, the method presented here manages to guide the student towards a thorough understanding of glaze principles while discovering excellent glazes. We don't need to understand Seger Formula to use this method, and it's far more satisfying and effective than throwing materials in a bucket and hoping for the best. Even as a beginner we can soon start to design our own experiments. One of the problems of many other approaches to glaze research is a failure to emphasise the vital importance of alumina and silica variations in pinning down specific effects and discovering exciting new glazes. These two vital variables are often dismissed as the "stiffener" and "glass former" respectively. While this description is quite accurate, it gives the wrong impression of their role and importance in determining the nature of the glaze. Systematic variation of alumina and silica, along with the fluxes, is central to this method, and is largely responsible for its success. The method is organised so that one is able to separate out the variables and therefore highlight cause and effect. It gives precise control and understanding of things like colour response, maturity, crazing, glaze surface phenomena such as mattness, shininess and orange-peel surface, as well as opalescence, opacity, colour-break phenomena etc.
The glazes are prepared in sets, 35 glazes in a set, arranged in a grid. We can think of the grid as being a series of line blends running horizontally and vertically: for example, glazes 1 to 5 make a "horizontal" line blend; glazes 1 to 31 make a "vertical" line blend.
See Diagram 1:
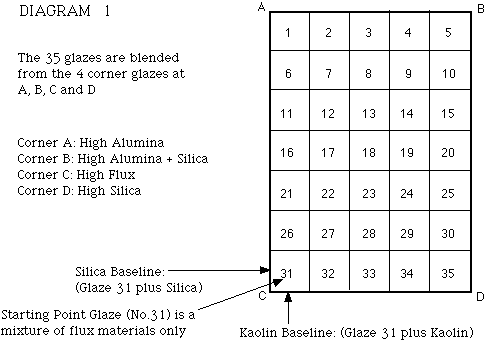
The Starting Point for the set is Corner C (Glaze No.31) which consists of 100% flux materials such as feldspar, zinc oxide, frit, whiting etc. We could actually obtain any of the 35 recipes by adding kaolin and/or silica to Glaze No.31. So within any one set, the flux ingredients do not change from glaze to glaze, but are "diluted" by kaolin and/or silica as we move away from Corner C.
In general terms, kaolin increases going from the bottom to the top of the grid, there being 0% of kaolin in the bottom row. Similarly, silica (quartz) increases going from left to right, there being 0% of quartz in the left hand vertical row.
Therefore glazes around Corner C are high flux glazes, around Corner A are high alumina glazes (from the kaolin), and around Corner D are high silica glazes. The glazes in Corner B can be thought of as low flux glazes, or alternatively, high in both alumina and silica. (In the middle of the set the glazes are reasonably balanced glazes, at least as far as alumina and silica are concerned.) We can confirm all this by looking at the four Corner Glaze Recipes listed below.
The following 4 recipes represent the grid corners:
CORNER GLAZE RECIPES:
| Glaze No. | Flux Materials | Kaolin | Silica | Colouring Ox. | Opacifier |
|---|---|---|---|---|---|
| 1 (A) | 60 | 40 | 0 | x% | y% |
| 5 (B) | 35 | 25 | 40 | x% | y% |
| 31 (C) | 100 | 0 | 0 | x% | y% |
| 35 (D) | 50 | 0 | 50 | x% | y% |
The 100% of Flux Materials in Glaze 31 (C) (see table above) can be any combination of fluxes in any proportions. However once we have decided this glaze, all the other recipes automatically follow, and can be calculated in our Calculation Page.
There are a number of important practical details that make this method so powerful in revealing so much with so little work. One is the use of volumetric blending to mix the 35 glazes from the 4 "Corner Glazes" listed above. We can of course weigh up and prepare each of the 35 glazes individually, especially if we have a very large group of people to share the work, but people working alone or in small groups will find that volumetric blending saves a lot of time. Details of this blending technique are given below, and also in the book "Stoneware Glazes: a Systematic Approach".
Our starting point will usually be a mixture of materials chosen from the List of Flux Materials. This can be done in a number of ways...
1. Those well versed in the theory of glazes may well be able to choose a set for what they have in mind. For example we might be aware that highly alkaline glazes give turquoise colour with copper oxide. So for our flux ingredients for Glaze No. 31 we might choose to use a high proportion of alkaline fluxes, perhaps 100% alkaline frit, or a very high proportion of barium carbonate. Or we may know that nickel gives interesting pinks or blues in barium/zinc glazes, so we might make Glaze no. 31 of barium carbonate, zinc oxide and feldspar. However...
2. If we know nothing, we may even choose a set of flux materials at random! This is not as daft as it sounds, but we might prefer to...
3. Refer to Rules of Thumb for Choosing a Flux Set.
4. We may just choose a known recipe that does something interesting and decide to base a set around the fluxes it uses. Normally this would involve a little maths to keep the fluxes in the same proportions as the original, but here we can avoid the maths by using the Calculation Page. See also Calculating a Flux Set from a Given Glaze
The percentage figures in glaze 31 are the key to calculating the whole set of recipes. Originally this was done by looking up a set of tables, but at this web site, you can do this at the Calculation Page.
The method has been standardised to minimise work and virtually eliminate calculations. The 35 glazes are produced quickly by volumetric blending; the recipes are produced at the Calculation Page; firing, recording data and assessment of the results are simplified by use of the Grid Tile. Diagram 1 shows the standard layout of glaze numbers.
The volumetric blending technique used to produce the 35 glazes in a set is outlined here.
The Recipe Table shows the list of 35 recipes. This is the same for all sets in this method. The problem is that there is usually more than one flux material being used in the set, and we therefore need a breakdown of the "Fluxes" column.
This is done on the Calculation Page.
This will give us the 35 base glazes for the set, including any colourants or opacifiers. The % of colourant should be constant across the 35 glazes in the set. This applies to opacifiers too.
Click Here for a description of making the grid tiles.
Print the necessary identification (identification of the set at least, possibly student's name as well) on the border of each tile using iron oxide or underglaze pencil. ( If the tiles are to be fired in stacks, then don't write underneath the tile in oxide lest it might fall onto a glaze underneath.) Set out the grid tiles ready for glazing. In a class, there will usually be at least one per person.
The "Grid Tile" saves a lot of time, and we normally use this for initial firings of the whole set. We usually glaze 10 or so replications ("clones") of the same set on a couple of different clays for firing in several different firing cycles. The production of extra "clone" tiles of a particular set takes very little extra time. With a little care they can be kept indefinitely to be fired in a variety of firing cycles. Handling and labelling or documenting time is minimised. Application of glaze to the 10 or so grid tiles is speeded by use of a syringe.
The same format is used in each set which allows standardisation of many aspects of the experimental method. This includes being able to look up all the recipes from a table, or at this web site, the recipes are produced at the Calculation Page.
The whole process from preparing the glazes to finishing glaze application of the grid tiles takes one person about 5 hours for one set. Working on your own this would be time very well spent, but working in cooperation with others and sharing the results means much greater work efficiency.
Stir each glaze before applying it to make sure the blend is mixed together properly. Orient the tiles to correspond with the layout of the glazes on the bench. The "A" marked in the top left corner of each tile corresponds to Corner A (Glaze No.1).
Apply the glazes one at a time using a well lubricated syringe, or a small spoon. A syringe is quick as we can apply to a number of tiles one after another, but it MUST be well lubricated or glaze will squirt over other glazes. Lubrication is usually helped by applying vaseline to the plunger, but if not then use a spoon. Try to get thick and thin application with each glaze; thick should be about 2 mm thick. Use a needle to check this. First apply the thin layer all over the compartment on the grid tile. Once the water is sucked into the bisque and the glaze "set", apply the second thicker coat.
We may prefer to fire the glazes as mixed. If however we decide to apply one or more colouring oxides to the set, this should be done with great care. The main concern is not to swamp the information contained in the systematic variation of fluxes, kaolin and silica. So the applied colouring oxides, if any, should leave most of each glaze sample untouched....
After the firing, study the oxide dots with a lens. Any colour variations around the edges of the dot gives a hint to what we will achieve if we blend that oxide into the initial glaze. It doesn't tell us how much of the oxide to add, but it does usually indicate if it is worth time studying this interaction more.
As mentioned elsewhere, there is no correct firing type for any particular set. There is a firing that will produce maximum interesting glazes, one that will produce maximum information for the student trying to understand the way glazes work, and a firing that will reveal those glazes well beyond the usually accepted boundaries... and these are probably all different firings. That's why we make lots of replications of the same set. In a grossly over- or under-fired grid tile, there may be just one glaze that makes the whole exercise worthwhile. It's impossible to know where the real successes will occur, but the "wide net" approach of the systematic method with the grid tiles ensures that if there is anything there, we can find it.
There are a few precautions worth mentioning that will help us get the most out of each set. A number of things can mask the subtle variations between one glaze and the next in a set, and make them all look very similar.
Once the tiles are drawn from the kiln the job of assessment can begin. With this method there are two levels on which this can occur.. firstly the matter of looking for useful, interesting or beautiful glazes. This is the same in any glaze research. However as a result of the systematic variation of important variables, this method also has the potential to reveal much more. I'm talking of how cause and effect principles can be revealed if our research can be systematically organised.
It's important to preserve all details of glaze, clay and firing. This is a matter of thorough and conscientious recording.
It is really useful, especially if we've not done it before, to plot out results on an Assessment Sheet. Some things are obvious when we look at the grid tile. However some characteristics such as crazing in a dark glaze can only be seen with a lens, and to understand the way crazing changes with varying alumina or silica we have to examine each glaze individually and record whether or not it is crazed on the assessment chart. We use a different grid for each characteristic, and write in the number inside each square corresponding to the property for that glaze on that tile.
Exploring the limits as we do with this approach will always turn up unusable and sometimes even dangerous glazes. Glazes might be under or over fired, poisonous, water soluble or sometimes shelling might cause the glaze to be shed in dangerous fine shards. To rely on published "limits" emanating from the industrial ceramics field can be safe, but exclude many of the exciting possibilities that are there for the hands-on clay worker. There is atrade-off between "foolproof" and "responsive" that applies to all things creative. The more foolproof we make our materials the less responsive they become. This is a fundamental law which has little to do with the nature of materials, and everything to do with the nature of human beings. Seeking the "foolproof" is the impossible quest for certainty and complete safety, and it actually strikes at the heart of what it means to be alive. And the commercial world of industrial ceramics explores the world of profit, and inhabits the landscape of the foolproof. If we are a creative clay worker we should have the ability to explore the uncharted regions beyond, without a map... but knowing how to survive! This method provides an exploring technique but we'll need to read elsewhere to learn more of the specific hazards and how to avoid them or detect them. Additional information can be found in Appendix 2: Safety and Health in "Revealing Glazes - Using the Grid Method"